BUILDING A PRIVATE NETWORK
for
MY SERVER

Last week, I got to learn how to build a private network for my server with guidance from my mentor. I’m sharing what I learned.
This is my practical walkthrough based on that experience. I hope it helps if you’re setting up a private network of your own.
Pre Required
- check_circle Docker Compose to run your apps.
- check_circle Traefik for routing.
- check_circle Tailscale for private access.
- check_circle Cloudflare for DNS and protection.
Lets start with Traefik
Let’s give this setup a home. Create a folder called traefik-server this is where we’ll keep the files for our Traefik server.
Inside the folder, create a file named docker-compose.yaml. This is where we’ll describe the services Docker Compose needs to start.
services:
  traefik:
    image: traefik:v3.7
    command:
      - "--api.insecure=true"
      - "--providers.docker=true"
      - "--providers.docker.exposedbydefault=false"
      - "--entrypoints.web.address=:80"
    ports:
      - "80:80"
      - "8080:8080"
    volumes:
      - /var/run/docker.sock:/var/run/docker.sock:ro

  whoami:
    image: traefik/whoami
    labels:
      - "traefik.enable=true"
      - "traefik.http.routers.whoami.rule=Host(`whoami.localhost`)"
      - "traefik.http.routers.whoami.entrypoints=web"
In your terminal, run docker compose:
docker compose up -d
docker compose up -d starts the services in the background. Docker downloads any missing images, such as traefik:v3.7
docker compose up -d --build also builds images from a Dockerfile before starting the services. Use it when your Compose file includes a service with a build: section and you’ve changed its source or Dockerfile.
For the Traefik setup above, there’s no build: section, so docker compose up -d is the one to use.
docker compose ps
To see list docker compose

Before we connect everything, we need a domain name. I already bought mine through RumahWeb , so I’m ready for the next step!
Download and Config Tailscale
We’ll use Tailscale to connect to the server privately. First, create a Tailscale account at Tailscale . Already have one? You’re ready to move on to the installation and configuration!
Add new machines: Click menu Network → Machines → Add Device → Select Client device.
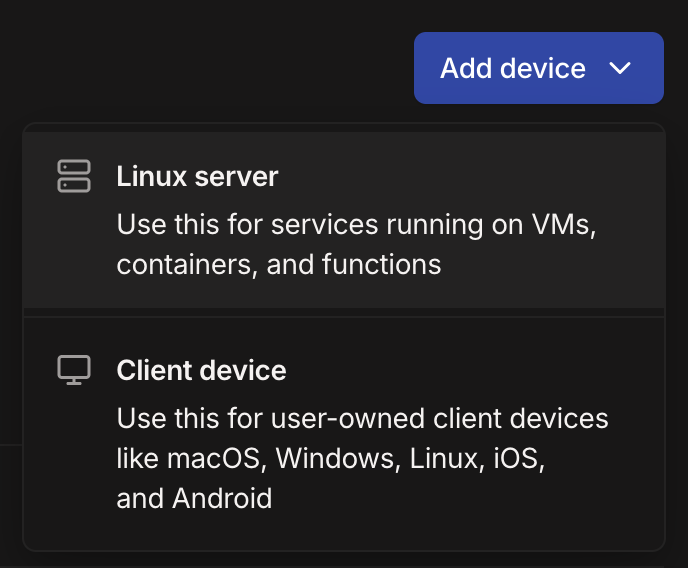
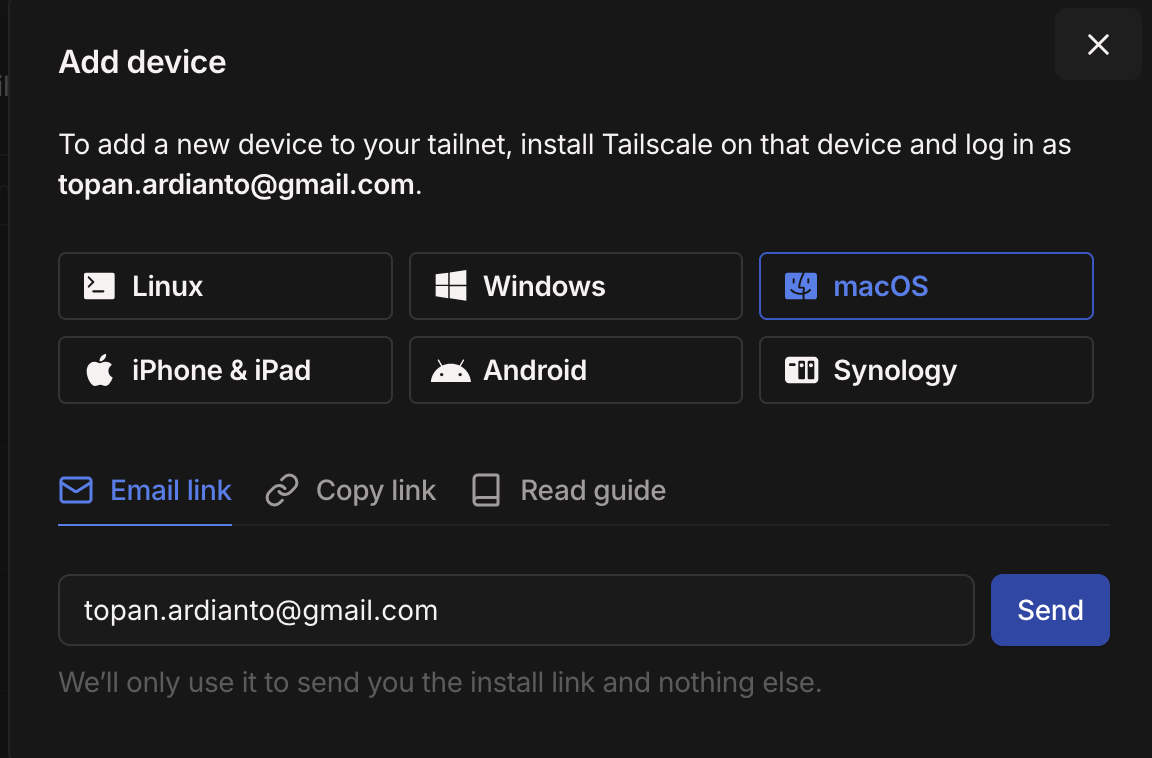
I don’t have a dedicated server PC yet, so I’m using my work MacBook for this setup. Your setup might look different, but the steps are similar.
First, download and install the Tailscale app for macOS . Open it, sign in with the account you just created, and follow the prompts to connect your MacBook to your Tailscale network. Once it shows as connected, your MacBook is on the team.

Now let’s connect a second device. I’m using my smartphone, but you can use another computer or tablet.
Download the Tailscale app on your phone, sign in with the same account, and follow the prompts to join your network. Once it’s connected, your phone and MacBook can find each other privately no need to be on the same Wi-Fi.

Once both devices are connected, Tailscale assigns each one its own private IP address. That’s how they can find and talk to each other over your private network.
Head over Cloudflare
Now let’s head over to Cloudflare and get the domain ready for the next part of the setup.
Let’s bring your domain into Cloudflare:
Click menu Domain → Overview → Add Domain → Connect a Domain
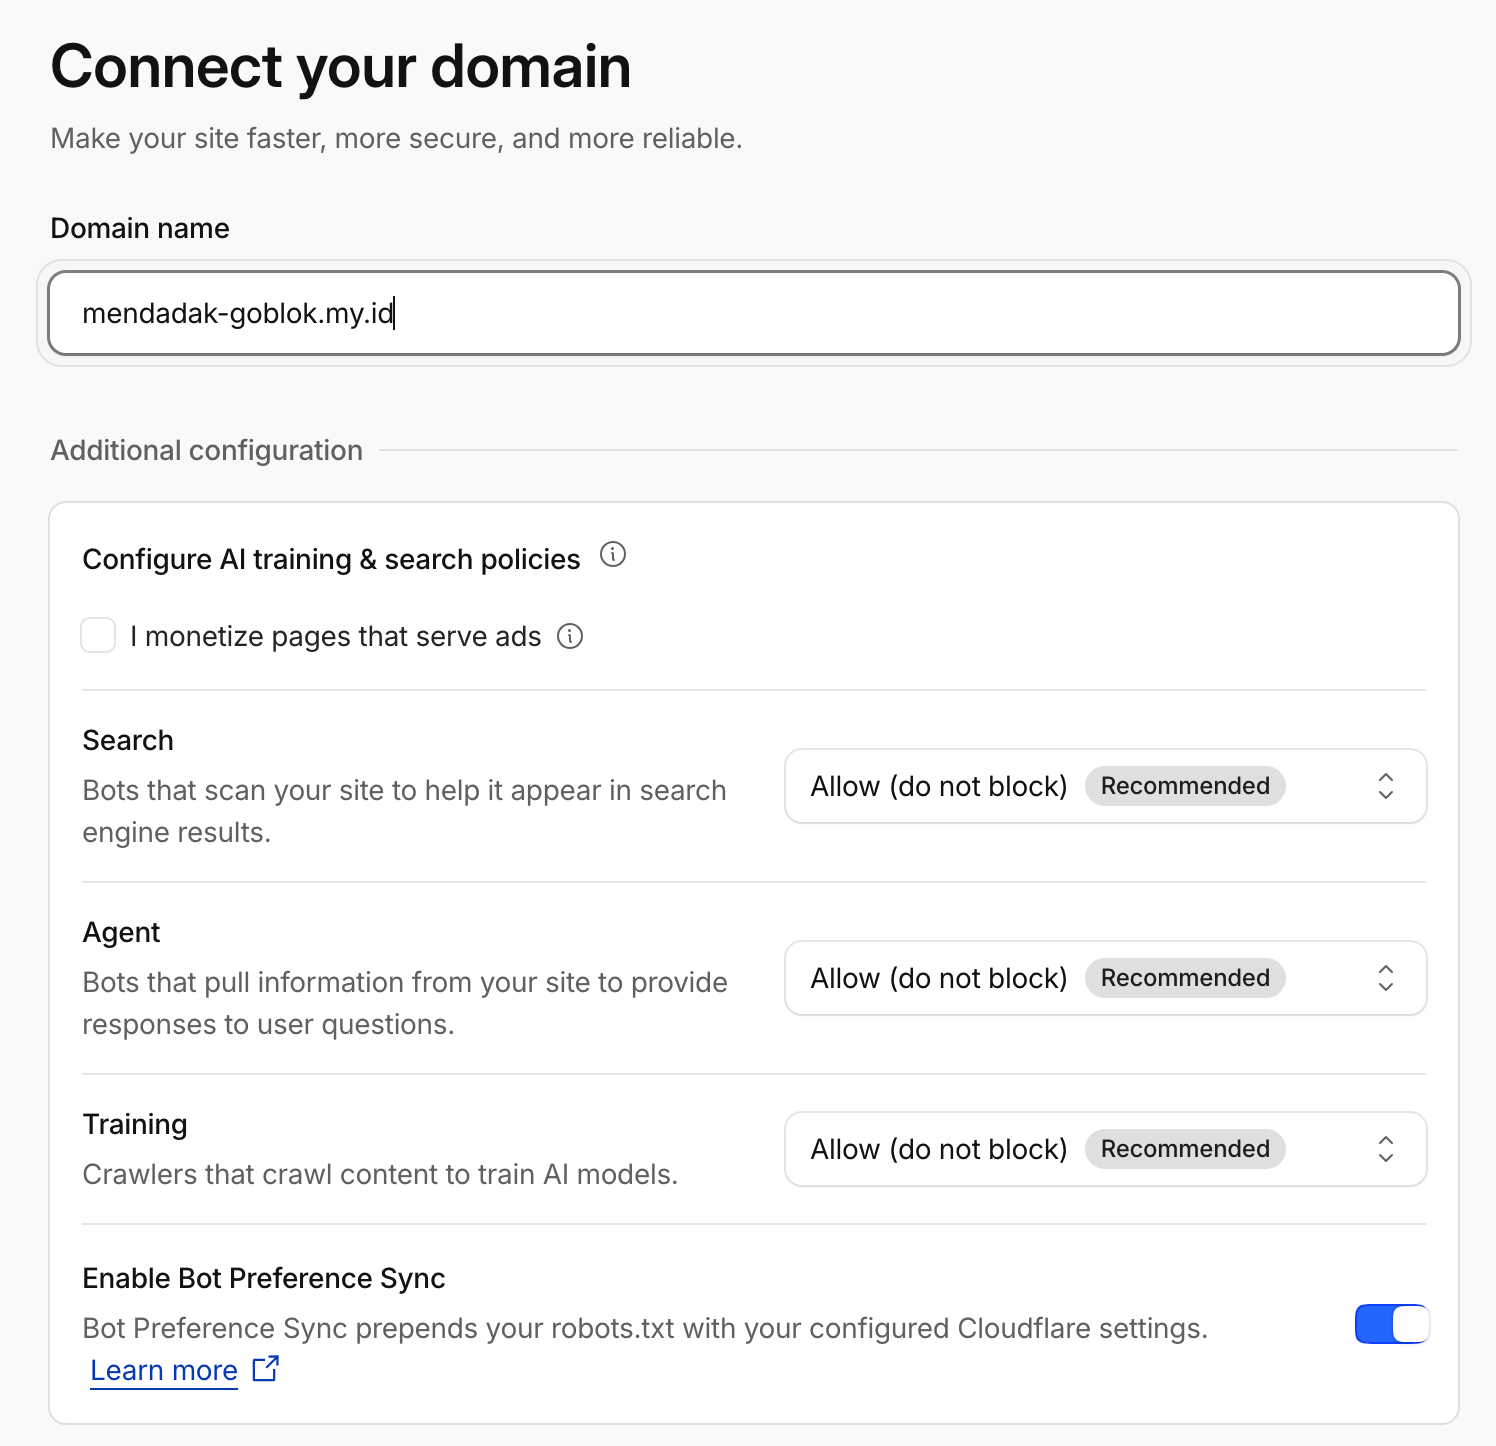
Click Continue and Cloudflare will show you two nameservers. We’ll need them in the next step, so keep this page open or copy both nameserver addresses somewhere.
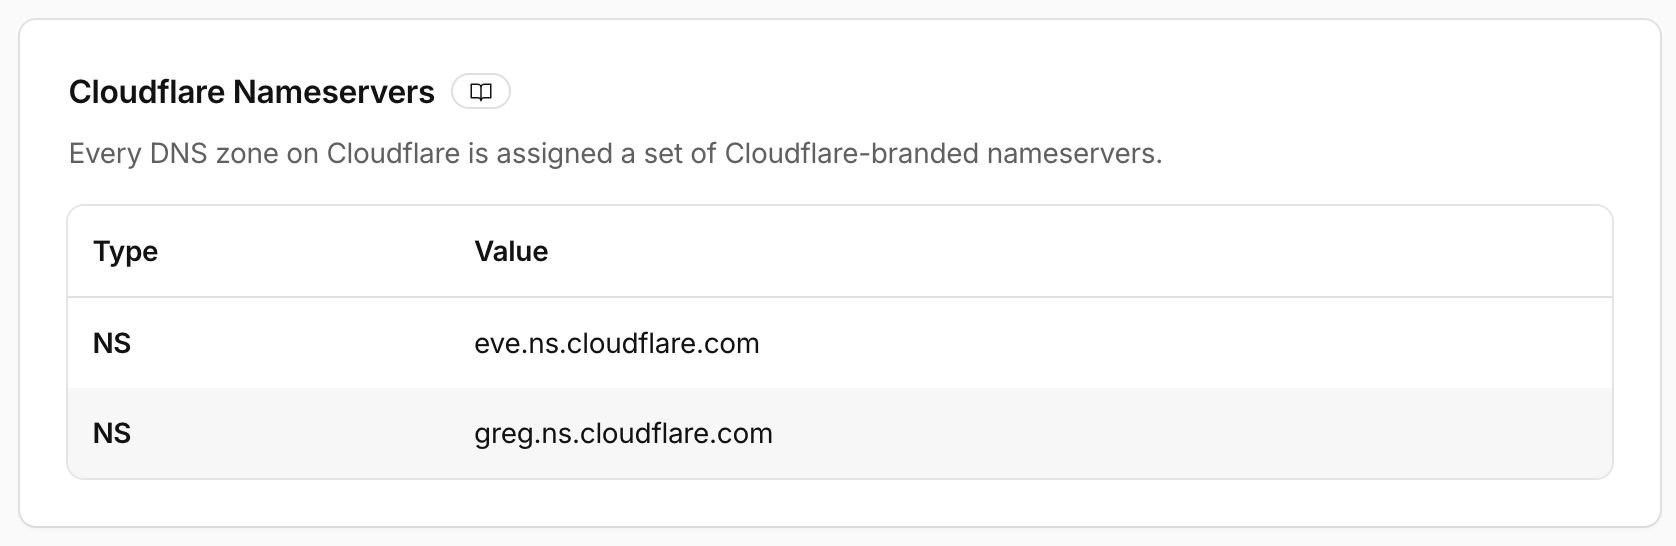
Let’s head to your Rumahweb dashboard to update the domain’s nameservers. Keep those two nameserver addresses from Cloudflare
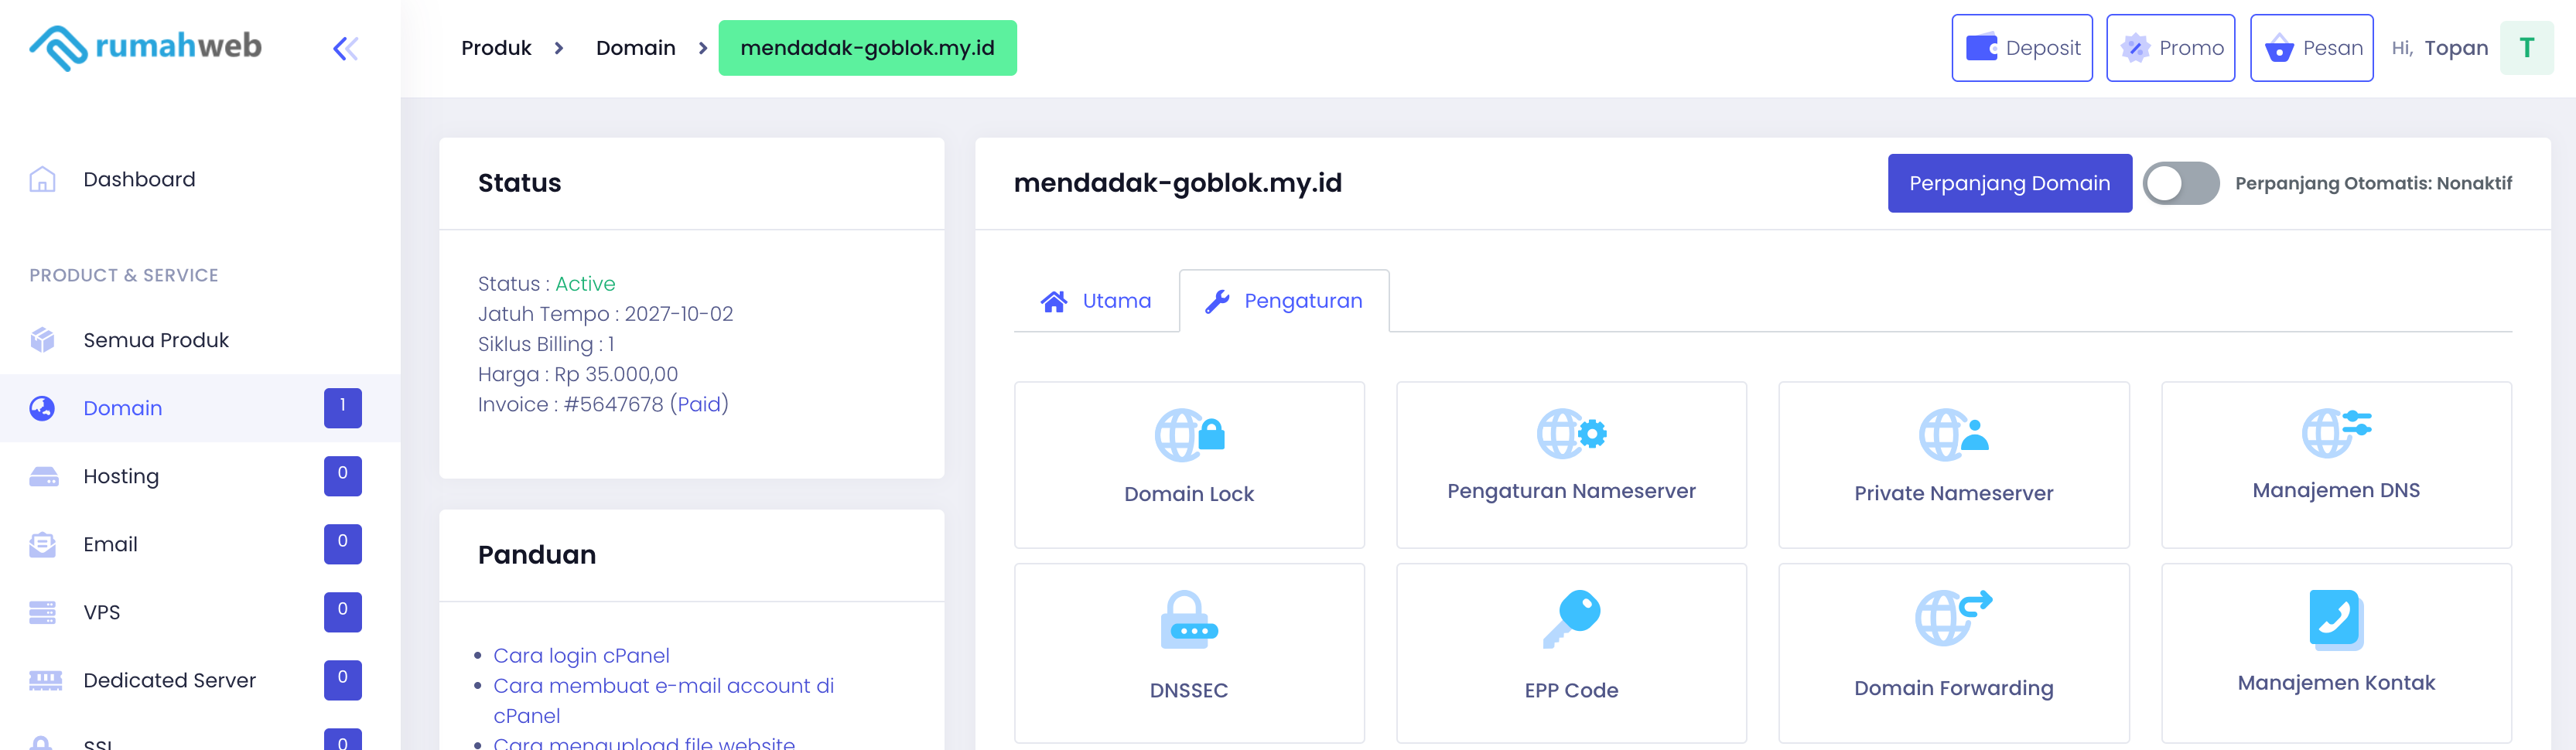
Select menu Domain → Setting → Pengaturan nameserver
Then input nameserver from Cloudflare
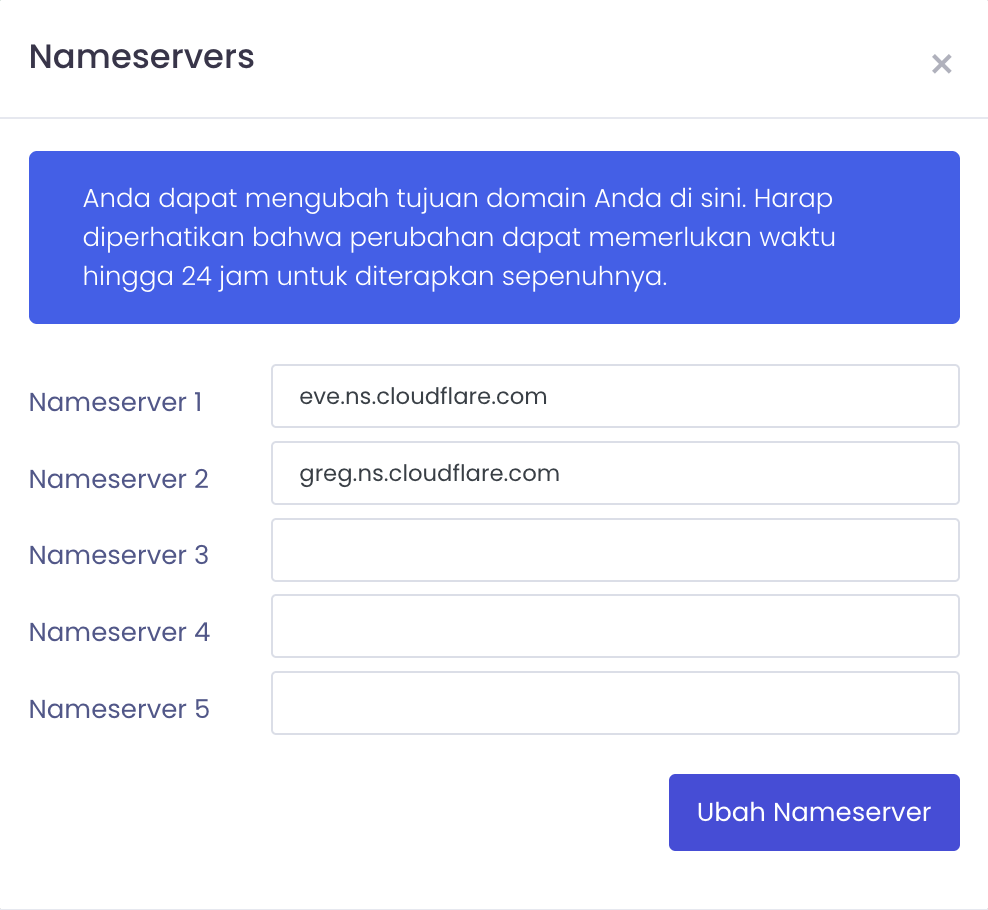
Save Changes to apply the new nameservers. Now the domain can start pointing to Cloudflare. Let’s give the update a little time to take effect.
Let’s return to Cloudflare and check whether your domain is ready for the next step.
Open menu Domain and select your domain to enter its dashboard. Then head to DNS → Records and click Add record. That’s where we’ll create the DNS record for your server.
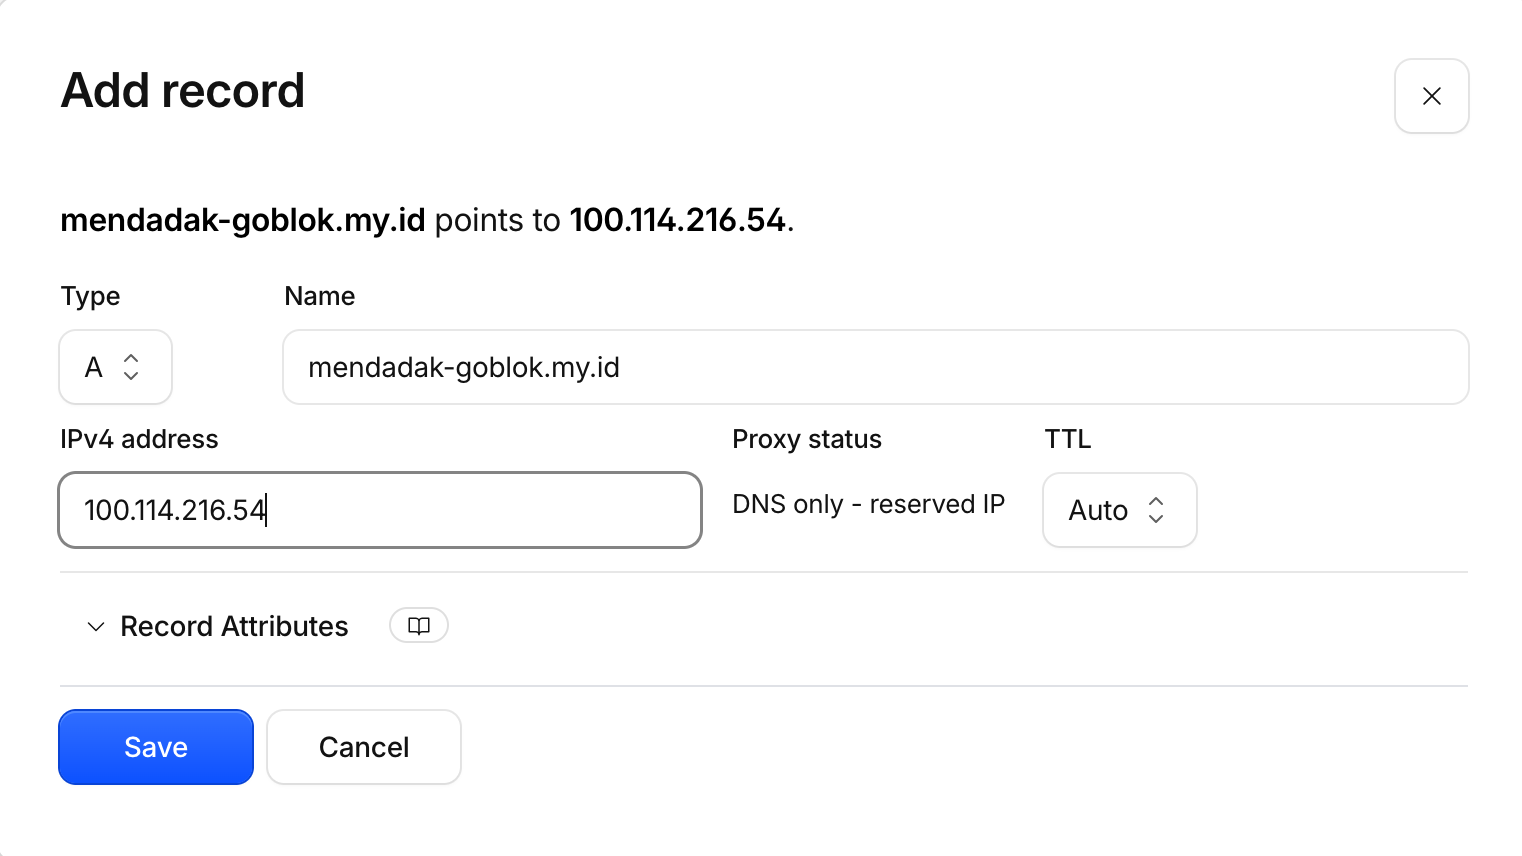
Now let’s connect your domain to server MacBook. Add an A record using your domain , then enter the MacBook’s Tailscale IP as the value. This points the name to your server over your private network.

Add a wildcard DNS record by entering * as the name and using the same Tailscale IP as the value. That way, new subdomains can point to your server too.
Next, we’ll create a Cloudflare API token so Traefik can work with your DNS settings. Head to your Cloudflare profile and open API Tokens
Click Manage account → Account API tokens → Create Token → Start from scratch (Custom)
Select a specific domain and select your domain.
At the DNS and Zone tab, select DNS to Edit, select your Zone to Read
That gives the token the access it needs for DNS updates on this domain.
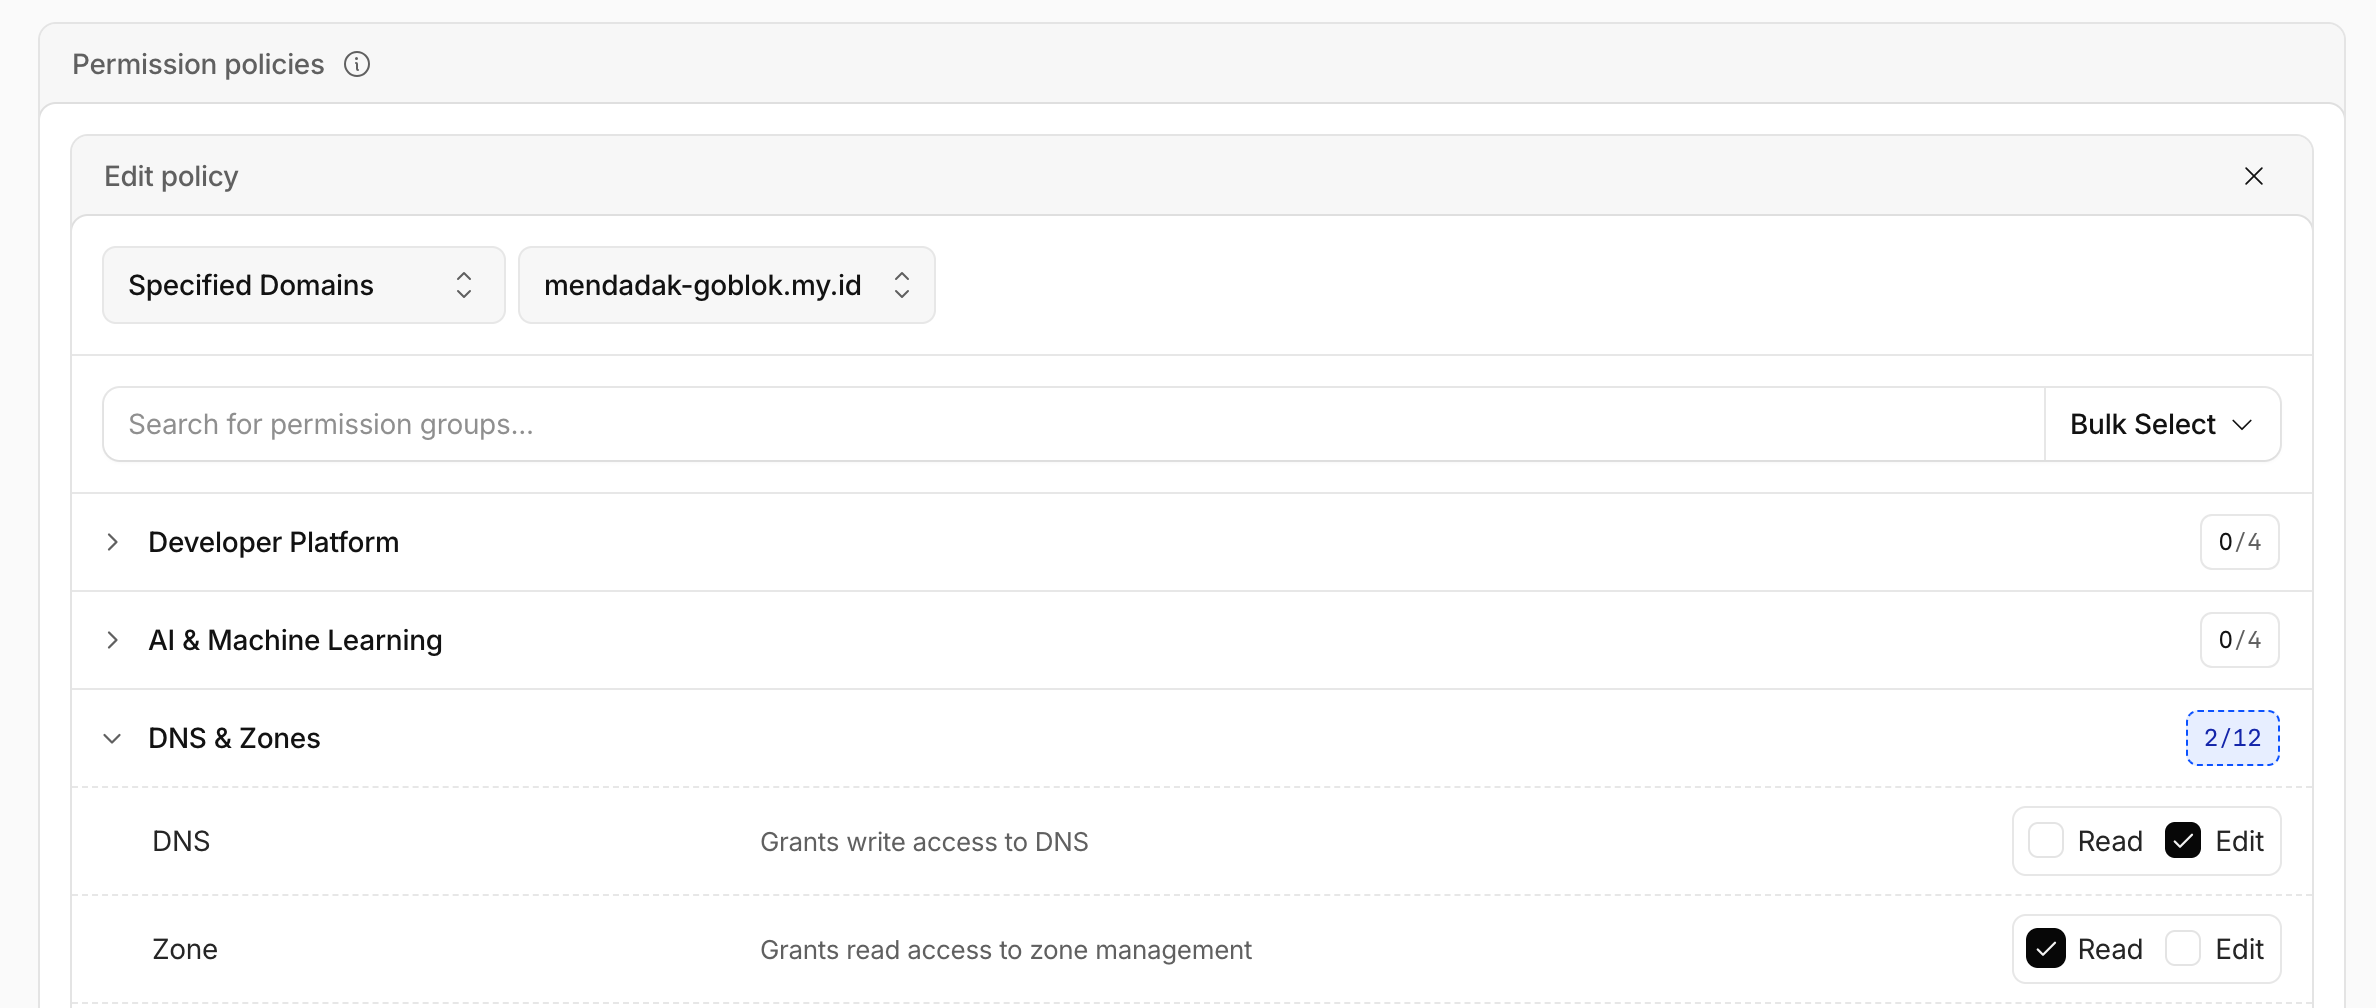
Click Review token, check the permissions, then select Create token. Copy the token and save it somewhere secure, we’ll need it later, and Cloudflare may only show it once.
Using TLS Protocol
Now we’re ready to set up TLS so connections to our services can be encrypted.
Let’s ask Let’s Encrypt for a certificate using Cloudflare DNS validation. Replace YOUR_CLOUDFLARE_API_TOKEN and email@gmail.com with your own values, then run this command from your project folder
docker run --rm -it
    -v "$(pwd)/acme_state:/acme.sh"
    -v "$(pwd)/certs:/certs"
    -e CF_Token="YOUR_CLOUDFLARE_API_TOKEN"
    neilpang/acme.sh --issue --dns dns_cf
    -d "*.mendadak-goblok.my.id" -d "mendadak-goblok.my.id"
    --key-file /certs/tls.key
    --fullchain-file /certs/tls.crt
    --server letsencrypt
    --email email@gmail.com
This requests one certificate for both the root domain and its subdomains. When the command finishes successfully, you should find the certificate files in certs/. Keep your API token private, and don’t publish it in your article or a public repository.
Create a folder named config, then add a file inside it called traefik-dynamic.yaml
tls:
  certificates:
    - certFile: /certs/tls.crt
      keyFile: /certs/tls.key
  stores:
    default:
      defaultCertificate:
        certFile: /certs/tls.crt
        keyFile: /certs/tls.key
Your project should now look like this
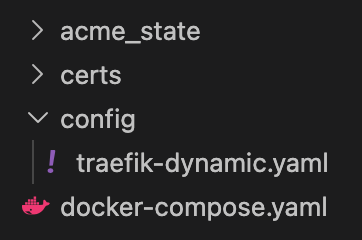
Now let’s open docker-compose.yaml and adjust it for our setup
services:
  traefik:
    image: traefik:v3.7
    container_name: traefik
    # restart: unless-stopped
    deploy:
      resources:
        limits:
          memory: 512M
        reservations:
          memory: 256M
    command:
      # - "--api.insecure=true"
      # - "--providers.docker=true"
      # - "--providers.docker.exposedbydefault=false"
      # - "--entrypoints.web.address=:80"

      # Logging
      - "--log.level=INFO"
      - "--accesslog=true"
      # Docker provider
      - "--providers.docker=true"
      - "--providers.docker.exposedByDefault=false"
      - "--providers.file.filename=/etc/traefik/dynamic.yaml"
      - "--providers.file.watch=true"

      # Entrypoints
      - "--entrypoints.web.address=:80"
      - "--entrypoints.websecure.address=:443" # use in label
      - "--entrypoints.web-public.address=:8080"

      # Timeouts
      - "--entrypoints.web.transport.respondingTimeouts.readTimeout=3600s"
      - "--entrypoints.web.transport.respondingTimeouts.writeTimeout=3600s"
      - "--entrypoints.web.transport.respondingTimeouts.idleTimeout=3600s"
      - "--entrypoints.websecure.transport.respondingTimeouts.readTimeout=3600s"
      - "--entrypoints.websecure.transport.respondingTimeouts.writeTimeout=3600s"
      - "--entrypoints.websecure.transport.respondingTimeouts.idleTimeout=3600s"
      - "--entrypoints.web-public.transport.respondingTimeouts.readTimeout=3600s"
      - "--entrypoints.web-public.transport.respondingTimeouts.writeTimeout=3600s"
      - "--entrypoints.web-public.transport.respondingTimeouts.idleTimeout=3600s"

      # HTTP to HTTPS redirect
      - "--entrypoints.web.http.redirections.entrypoint.to=websecure"
      - "--entrypoints.web.http.redirections.entrypoint.scheme=https"

      # Dashboard
      - "--api.dashboard=true"
      - "--global.sendAnonymousUsage=false"
    ports:
      - "80:80"
      - "443:443"
      # - "8080:8080"
    volumes:
      - /var/run/docker.sock:/var/run/docker.sock:ro
      - ./config/traefik-dynamic.yaml:/etc/traefik/dynamic.yaml:ro
      - ./certs:/certs:ro
    labels:
      - "traefik.enable=true"
      - "traefik.http.routers.traefik.rule=Host(`mendadak-goblok.my.id`)"
      - "traefik.http.routers.traefik.entrypoints=websecure"
      - "traefik.http.routers.traefik.service=api@internal"
      - "traefik.http.routers.traefik.tls=true"
    networks:
      - pandz-network

  whoami:
    image: traefik/whoami
    labels:
      - "traefik.enable=true"
      - "traefik.docker.network=pandz-network"
      - "traefik.http.routers.whoami.rule=Host(`whoami.mendadak-goblok.my.id`)"
      - "traefik.http.routers.whoami.entrypoints=websecure"
      - "traefik.http.routers.whoami.tls=true"
      - "traefik.http.routers.whoami.service=whoami-svc"
      - "traefik.http.services.whoami-svc.loadbalancer.server.port=80"
    networks:
      - pandz-network

networks:
  pandz-network:
    external: true
I’m using Traefik as my reverse proxy and whoami as a simple test service. Whoami gives us an easy way to check that requests are reaching the right place.
Traefik listens on two ports:
- check_circle Port 80 receives regular http:// traffic and redirects it to HTTPS.
- check_circle Port 443 handles encrypted https:// traffic.
Both containers join the Docker network pandz-network, so Traefik can reach the test service. Traefik also reads Docker’s socket to discover containers automatically. I’ve mounted that socket as read-only, along with the dynamic configuration and certificate files Traefik needs.
That’s the basic flow: a request reaches Traefik, gets redirected or secured with HTTPS, and is then routed to the right service.
What happens when I visit https://mendadak-goblok.my.id?
The request arrives at Traefik on port 443. Traefik checks the hostname, matches it to the dashboard router, and sends it to its internal dashboard service, api@internal. If everything is configured correctly, the Traefik dashboard appears.
Now let’s try https://whoami.mendadak-goblok.my.id.
This request also arrives on port 443, but Traefik sees a different hostname. It matches the whoami router and forwards the request across the Docker network to the whoami container on port 80.
Run docker compose:
docker compose up -d

If something isn’t working as expected, let’s peek at Traefik’s live logs. From your project folder, run:
Debug Log
docker compose logs -f traefik
New log messages will appear as they happen. Press
See the Result
Lets see it working:
I connected my Mac server to Tailscale
I’ve connected my Zenfone to Tailscale, so it can join my private network alongside my Mac server
I can now reach my Mac server from my Zenfone over my private Tailscale network. One device hosts the service, the other connects and I can check in without exposing the server to the public internet.
I open https://mendadak-goblok.my.id to check that I can reach the Traefik dashboard
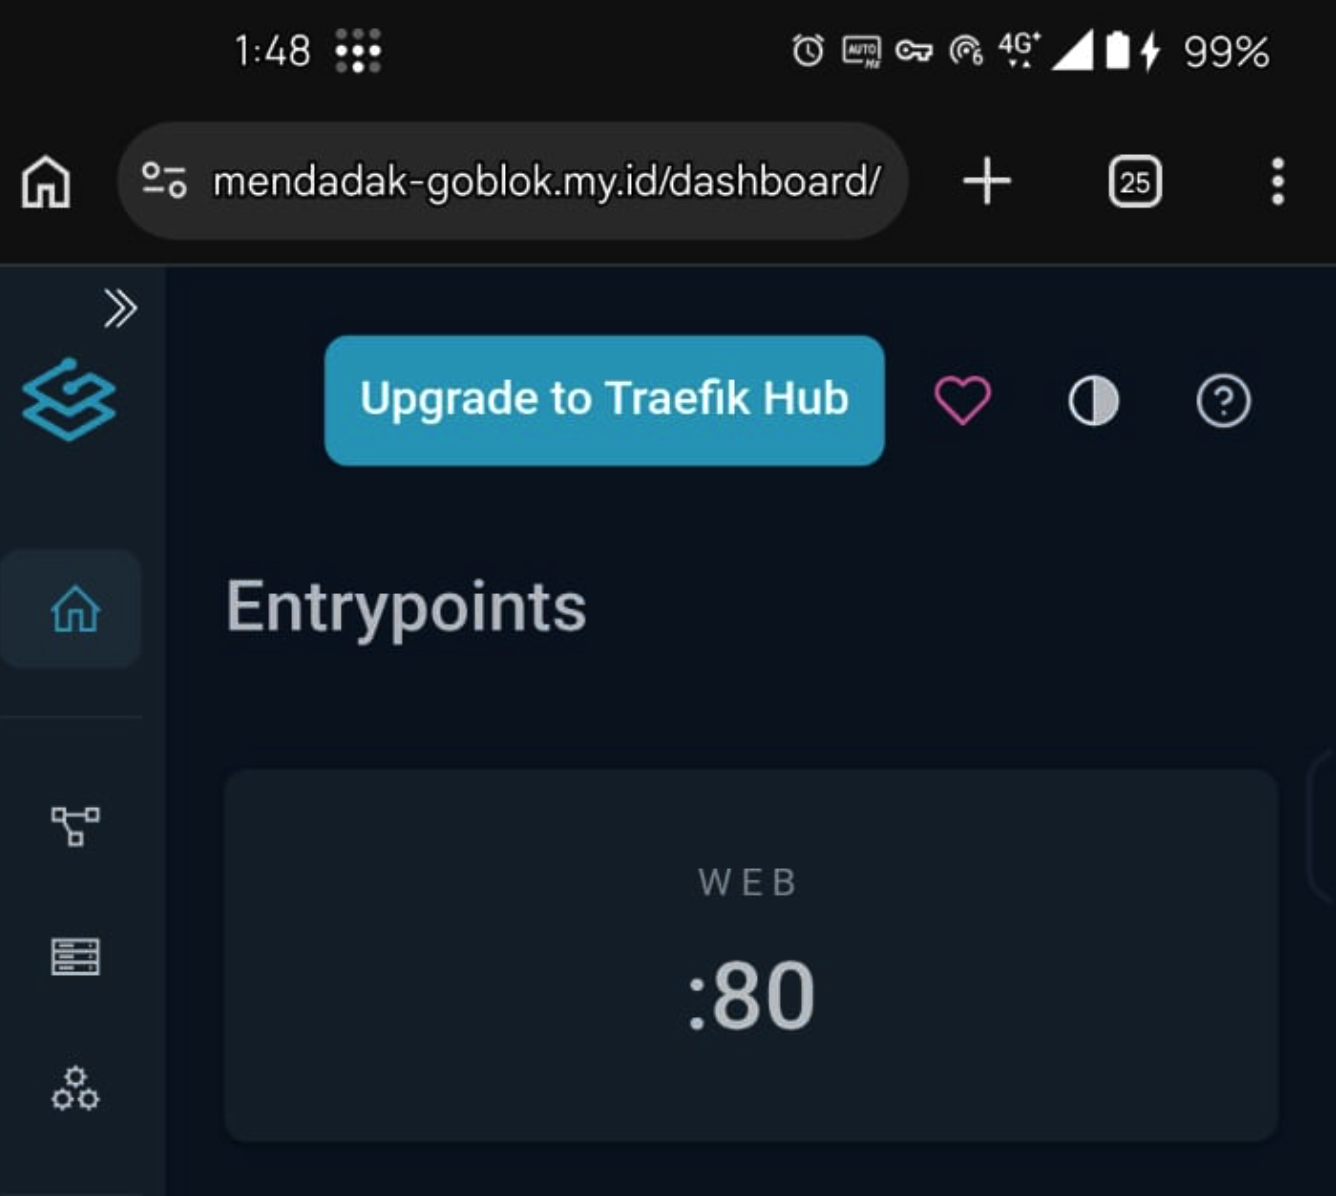
Then I try https://whoami.mendadak-goblok.my.id and see whether Traefik routes me to the whoami test service.
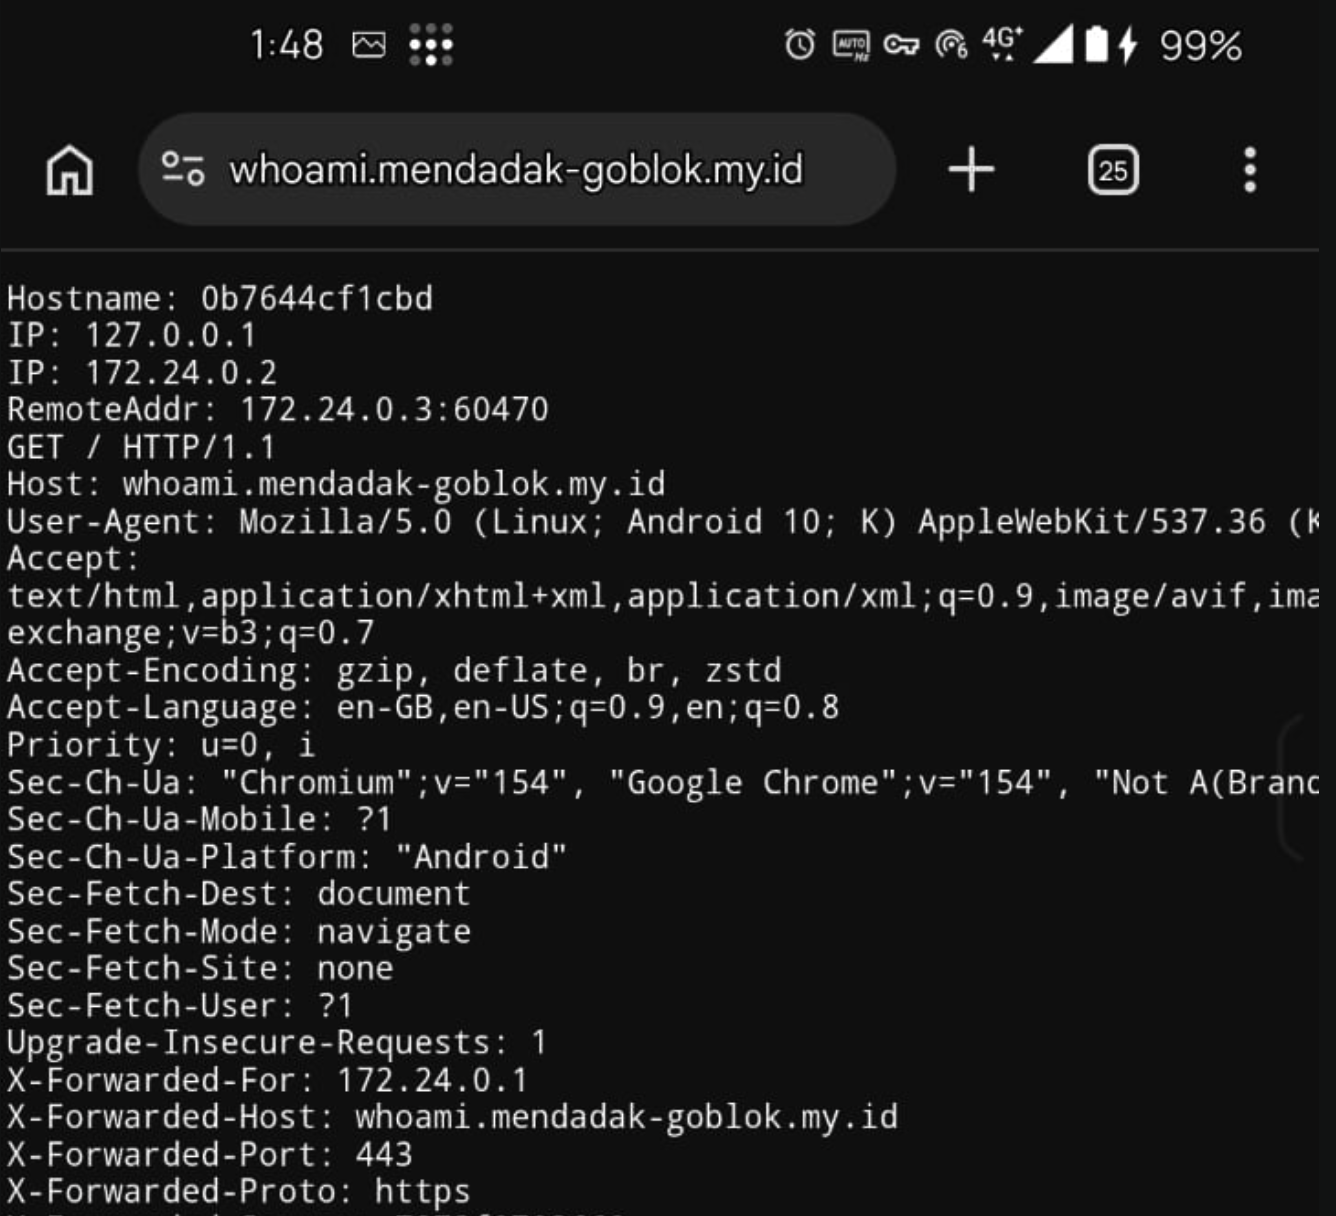
Both links work! My Zenfone can reach my Mac server through the private network
Reference
Reference:
https://doc.traefik.io/traefik/getting-started/docker/https://tailscale.com/docs/how-to/quickstart https://zerossl.com/p/acme-sh


